
All applications need authorization to access and interact with content in Marq. Authorization is the process through which a user gives an application permission to access specific parts of their Marq account—whether it’s documents, templates, team information, or user profile data. These permissions are controlled through scopes, which define what your app can do once access is granted.
As part of the authorization process, users will see exactly what scopes your app is requesting and must explicitly approve them before any data can be accessed. This gives users confidence in what data is being shared and helps your app behave responsibly with their information.
Authorization
In order to use any of the Marq REST APIs, an app must have permission from the user to access their data. This permission can be granted with an OAuth 2.0 Authorization Code Flow.
Why OAuth 2.0?
OAuth 2.0 lets your application act on behalf of a Marq user without needing their credentials. With this flow, users can authorize your app to perform actions—like creating documents or accessing team data—while keeping their login details private.
For example, your app can request permission to create and manage documents within a user’s workspace, without gaining access to their other private documents or settings.
Prerequisites
Create a Marq account
To create an account, you will need to sign up for Marq account, enter your email address, and then click "get started". You can also sign in directly with Google.

Create your app in Marq
Permissions
Registering a new application requires Team Admin permissions for the Marq account. If you are developing an application as a partner to Marq or for a client, you can request your Marq account to be upgraded to create an application.
To set up an app to use OAuth 2.0, perform the following steps:
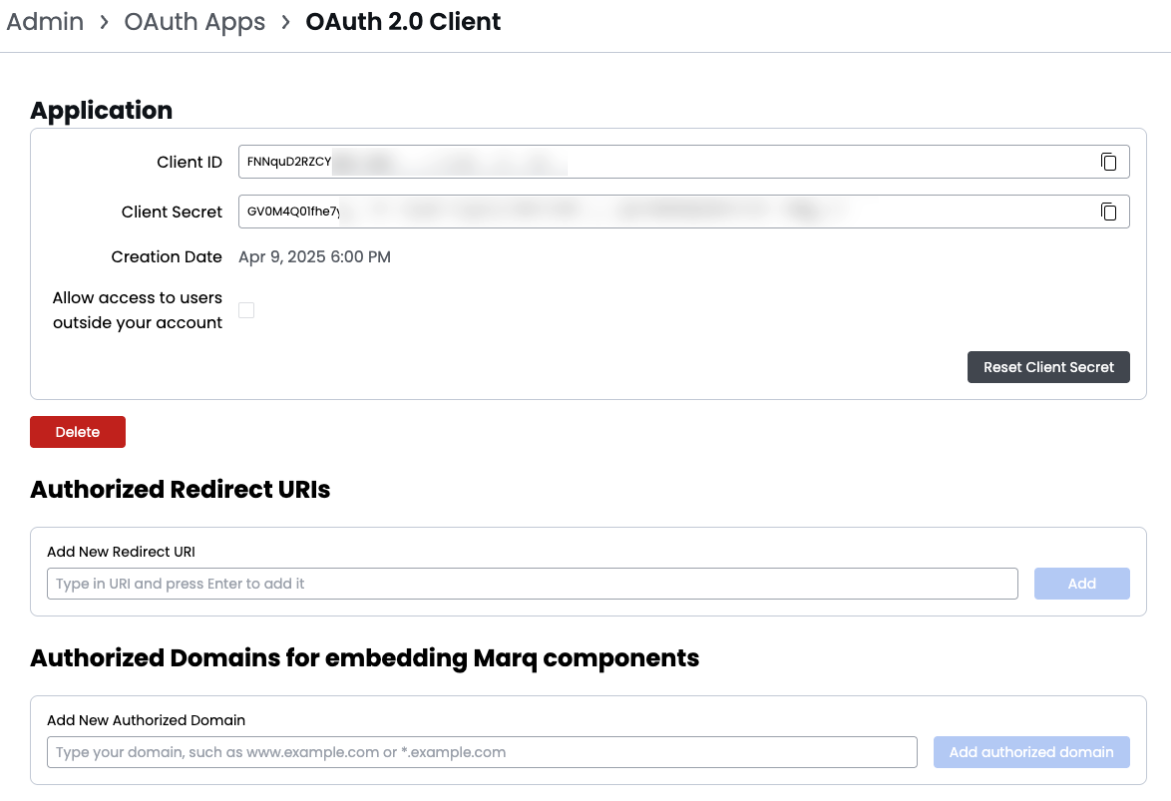
- Obtain an OAuth 2.0 client ID and client secret from the account's Marq's team administration page (OAuth Apps).
- Register at least one redirect URI on that page. Marq will redirect the user to this location once they have granted access. This should be a URL that the app controls. Marq will append the authorization code to the URL in the code query parameter.
OAuth authorization code flow
- Create authorization request link
- Request user for authorization
- Exchange authorization code with access token
- Use access token for REST API requests
- Get new access token using refresh token
- (Optional) Get access token context
- (Optional) Revoke token
The OAuth 2.0 Authorization Code flow begins when the application directs the user to an authorization URL, where they are prompted to authenticate and grant the requested permissions.
Upon successful authorization, the user is redirected to the application via a predefined redirect URI. This redirect includes an authorization code as a query parameter.
The application then sends this authorization code to the authorization server to exchange it for an access token.
If the authorization process fails at any point, the server will return an error instead of an authorization code.
All subsequent API requests must include a valid access token. This token conveys the scopes the user has authorized and defines which API operations the application is permitted to perform on the user's behalf.